Looks like Mum's in a good mood today!
Tuesday, June 30, 2009
~ Ham and Cheese Sandwich Squares
...squashed and squared! But they look yummy, don't they?
There was a surprise visit from a bold new-comer too:
~ Gnocchi in Basic Tomato Sauce
Description:
Soft potato dumplings coated with tangy tomato sauce~
Ingredients:
3 medium size potatoes (~300g)
1 medium egg, lightly beaten
1 1/2 C flour
1/4 C flour
Salt and pepper to taste
2 1/2 medium tomatoes, diced
1 tsp oil
1 clove garlic, minced
1/2 tsp chilli flakes
1/4 tsp mixed herbs
2 tsp ketchup
3 medium size potatoes (~300g)
1 medium egg, lightly beaten
1 1/2 C flour
1/4 C flour
Salt and pepper to taste
2 1/2 medium tomatoes, diced
1 tsp oil
1 clove garlic, minced
1/2 tsp chilli flakes
1/4 tsp mixed herbs
2 tsp ketchup
Directions:
1) Cut potatoes into quarters and boil in salted water till easy to mash but still firm. Mash and leave to cool.
2) Add in egg, 1 1/2 C flour and 1/4 tsp pepper. Knead into a pliable dough, adjusting with the 1/4 C flour.
3) Separate dough into 4 parts, and into 4 rods. Cut into small gnocchi with a knife and press each down with a fork.
4) Cook in salted water till the gnocchi floats, and remove to set aside.
5) Reserve 1/2 tomato, and blister 2 tomatoes with some water. Mash slightly and set aside.
6) In a cooking pan, fry garlic and chilli flakes in oil till fragrant. Add in all the tomatoes, ketchup and mixed herbs. Cook for another 3 min, and adjust to taste with pepper or salt.
7) Stir in some gnocchi till heated up, and serve hot.
Remarks:
I like the tomato sauce, so much like those you can find in eateries - the blistered tomatoes imparted a plummy sweetness to the chunky sauce which was also punctuated with the zingy taste of garlic and herbs. On the other hand, the gnocchi was rather lacking in taste, I think I boiled the potatoes for too long and subsequently added too much flour to make a pliable dough since the potatoes absorbed a lot of water when boiling. But they look soooo good when raw:
And yes, it's too much gnocchi as well!!! The quantity can serve 3-4 people, whereas the sauce is only for one! The excess cooked gnocchi were kept in a tupperware filled with water to prevent them from sticking to each other. I tried toasting some and they tasted like.. flour crackers?
Monday, June 29, 2009
~ B'day Rant
Gosh, this blog dedicated to experiments in the kitchen is really (unintentionally) turning into an avenue for me to vent my frustrations out=x Here's a sms conversation I had with my Dad over my b'day celebration (they asked me to make reservations for Swissotel buffet dinner previously):
T: swisshotel havin crab buffet dinner (along with int'l buffet) going for $46/pax. If got HSBC card 1 pax free for 3 pax dining. May need to book 2 weeks in advance. But I haven called. how?
D: I am ok
T: Ok u make reservations den. I dun like to pay more than wat other people pay for. Rather eat sth else
D: ok... lets eat at sakura after fun in down town east escape- good idea?
T: Nope.
D: wats good then
T: Slack at home, eat homecooked food, sleep and live normal
D: Good lah.....
Not funny at all, but I just want to emphasize my lack of interest in celebrating my 21st b'day. Why celebrate for being older? I don't give a hoot for any of my previous b'days, what makes 21st so special that I have to celebrate it? Simply because others did? Simply because others want me to? I'm still myself anyway, before or after my 21st. So no point wasting the $ for some insignificant issue (Mum said I'm just being stingy). Family aside, there are still external factors. I try to tell my friends not to get me any presents in the nicest way possible, and at the most a simple cheap meal treat will do, that's it. And then they start questioning me and shooting me with sarcastic remarks. Eventually they may get something which I do not need nor want (happened countless times before). Why can't anyone understand?
Leave me alone, and just let me be. Please.
Sunday, June 28, 2009
Saturday, June 27, 2009
~ Garbanzo Bean Flourless Chocolate Cake
Description:
Gluten-free, oil-free, high protein chocolate cake~
Ingredients:
200 g 70% chocolate chunks, melted
15.5 ounce can of garbanzo beans (~300 g dry weight), drained and mashed
3 eggs
55 g white sugar
1/2 tsp baking powder
1/4 tsp baking soda
3/4 tsp vanilla essence
Cocoa powder for dusting tin
Icing sugar for dusting cake
200 g 70% chocolate chunks, melted
15.5 ounce can of garbanzo beans (~300 g dry weight), drained and mashed
3 eggs
55 g white sugar
1/2 tsp baking powder
1/4 tsp baking soda
3/4 tsp vanilla essence
Cocoa powder for dusting tin
Icing sugar for dusting cake
Directions:
1) Grease a 9" round tin and dust with cocoa powder.
2) Whisk eggs and sugar till fluffy, before adding in baking powder, baking soda and vanilla.
3) Beat in beans till well-mixed, and blend in chocolate. Pour batter into tin.
4) Bake in a preheated oven at 175 deg for 10 min, then bring down the temperature to 160 deg for another 60 min, or till cake is done (when cake has doubled in size and that a skewer through the centre comes out clean). Cool for 15 min before cutting. Serve dusted with icing sugar.
Remarks:
This cake gave off the most amazing aroma when it was in the oven, it activated my salivary glands and made me so compelled to open the oven door and take a bite off the cake. The temptation was so great that while it was being cooled, I pinched some off to taper my strong desire to sink my teeth into the soft wholesome cake... hmm hmm...
Ok, fine fine I am just exaggerating =x I'm not that desperate for chocolate cake for now. The reason why I had baked this is out of curiosity. I've heard of flourless chocolate cakes, but one that incorporates chickpeas?? Nope. The whole process was rather simple as seen from above methods, and yes the whole house smelled great when the cake was baking. Turned out that cake took a longer time to bake than expected, and I had cut the sugar content by half as I used bitter chocolate (Cadbury Old Gold 70%) that came with a rather high content of sugar. Taste-wise, it was delectable! The crust was crisp due to the roasted chickpea bits on the surface, and the cake was fudge-like and moist with the perfect amount of sweetness (do not take anything sweet before eating the cake, if not you'll desensitise your tastebuds and the cake will no longer taste sweet). Do take sufficient water after eating this, for the chocolatey taste can give you a bad sorethroat!
A sidenote: I used S&W canned chickpeas, and the chickpeas still had their seed coats on. I do not really remember seeing those in some organic low-sodium chickpeas I've previously bought for my chickpea pasta. To remove the coats, just place the chickpeas in a big bowl of tap water, swirl around with a slotted spoon to free the coats and to remove them. After which, drain off the water and mash the naked chickpeas using the same slotted spoon. A single spoon, a 'thousand' uses!
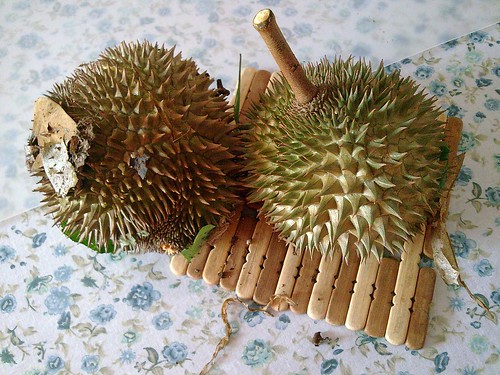
Oh ya my parents went to pick durians, mangosteens and rambutans from Upper Pierce Reservoir in the morning while I was baking (shhh don't tell the authorities!). This is the first time I've tried fresh durians as durians sold in Singapore have been shipped a long distance from neighbouring countries. Unlike the durians sold outside, the Singapore durians were creamy and were sweet with a slight tinge of bitterness. I can really savour the freshness from the taste. There were plenty of seeds in each compartment, and the flesh was substantial. The aroma (some people simply detest it though) of the fruits still lingered on my hands after I've licked the flesh clean off my fingers. Yummy!
My dear Lao Pa and Lao Ma, when are you guys going over to get some nice Singapore durians for your durian-starved daughter again?
Friday, June 26, 2009
~ Vegetarian Singapore Fried Noodles (Xin Zhou Mi Fen)
Description:
Vegetarian rice vermicelli with a hint of curry~
Ingredients:
100 g vegetarian charsiew, diced
50 g vegetarian ham, sliced
2 tbsp oil
1 tsp minced ginger
1 tbsp curry powder
3 dried Shiitake mushrooms, soaked and sliced
200 g Kai Lan, stems and leaves separated
50 g bean sprouts
2 bundles of rice vermicelli, soaked in warm water and drained
1/2 tbsp soysauce
1/2 tbsp dark soysauce
1 tbsp water
1 tsp sugar
2 eggs, beaten
Directions:
1) Stir-fry vegetarian meat in 1 tbsp oil till slightly browned in a wok, and set aside.
2) Add remaining oil, along with ginger, curry powder and enough water to make a paste. Fry till fragrant and add in mushrooms to cook for 3 min.
3) Add in the stems of the kai lan and fry till slightly soft before adding in the leaves and beansprouts. Pour in 1/4 C of water and cover the lid to let cook for 3 min. Meanwhile, dissolve sugar in 1 tbsp water and all the soy sauces. Take a tsp and mix into the whipped eggs.
4) Gently toss in the rice vermicelli to coat, along with the soyasauce mixture and cooked vegetarian meat. Fry on medium heat for around 3 min to dry up excess moisture.
5) Push everything to the side of the wok to leave a space for the eggs. Scramble the eggs till slightly dry before tossing with the cooked rice vermicelli. Serve warm.
Remarks:
Tasted alright for a first attempt. I guess it's the seasonings of the vegetarian meats that make the dish better, as I could barely taste the curry and soysauce. K didn't realise that there were bean sprouts inside, should add more next time! Try not to toss the rice vermicelli around too much or just add in last, if not you'll end up having mini ones like mine =x
Wednesday, June 24, 2009
~ Or Nee (Yam Paste)
Description:
Traditional chinese dessert for a sweet tooth!
Ingredients:
450 g yam or taro, diced
160 ml milk
30 g sugar
30 ml oil
450 g yam or taro, diced
160 ml milk
30 g sugar
30 ml oil
Directions:
1) Boil yam in water for 15 min till soft.
2) Drain liquid, and mash the yam. Add in some milk for easier mashing.
3) Heat oil in a wok over medium heat, and stir in the yam carefully.
4) Add the rest of the milk to make the dish less chunky.
5) Add sugar and stir-fry till fragrant.
6) Serve warm or cold
Remarks:
Or Nee is one of my favourite desserts around, but those that one can bu outside are ladened with oil and sugar (that's why they taste so yummy!) To avoid the unhealthiness and still enjoy the yumminess, I just had to try making Or Nee for myself! It turned out slightly dry and pasty, I could have added more milk to let it be in a more liquid state, but I like it this way, for it gives me a feeling of real substance in the dish. The yam taste was not as pungent as I hoped it would be, as I drained the boiled yam. Initially I wanted to steam them but I guess I was too lazy =x Laziness stole away the gingko nuts that were supposed to don this amazing dessert. Anyway, it's a sugar-reduced recipe, so if there is a need to, always feel feel to stir in some honey or syrup or coconut milk to moisten it :)
Saturday, June 20, 2009
~ Pineapple Chiffon Cake
Adapted from:
Mum's
Mum's
Description:
Every bite into this soft fragrant chiffon cake brings out pineappley goodness!
Ingredients:
(A)
5 egg yolks
60 g sugar
2 tbsp of pineapple juice
Some pineapple pulp
1 tsp pineapple essence
(B)
100 g flour
1/2 tsp baking soda
1/2 tsp baking powder
(C)
5 egg whites
1/2 tsp cream of tartar
50 g sugar
45 ml oil
Handful pineapple chunks
(A)
5 egg yolks
60 g sugar
2 tbsp of pineapple juice
Some pineapple pulp
1 tsp pineapple essence
(B)
100 g flour
1/2 tsp baking soda
1/2 tsp baking powder
(C)
5 egg whites
1/2 tsp cream of tartar
50 g sugar
45 ml oil
Handful pineapple chunks
Directions:
1) (C): Beat egg whites, cream of tartar and sugar together till soft peaks form and set aside.
2) (B): Sift all together.
3) (A): Beat egg yolks and sugar together till pale. Mix in essence, pineapple pulp and juice.
4) Whisk (A) and (C), followed by (B).
5) Add in oil.
6) Gently pour the batter into a 12" chiffon cake tin where pineapple chunks had been laid down on, and give the filled tin a few quick knocks to remove any bubbles.
6) Bake in preheated oven at 150 deg, for 50 min.
7) Invert the whole tin while cooling to prevent collapse of cake. Slice when cool.
Remarks:
Interesting taste from a chiffon cake and sweetness was just nice. The texture was slightly different from that of the banana chiffon, but still yummy and soft! Anyway, this was made by Mum and I together (though most of the time Mum was calling the shots), so sweet right! ^ ^
Tuesday, June 16, 2009
~ Russian Tea Cakes II
Made them again, this time only halving the quantity (100 g butter though) and adding 70 g of ground almonds. Baked for 30 min at 150 deg. Turned out better but I do not know why the cookies take so long to bake! The insides were rather moist.. Could it be due to the cheap almonds and butter that I got from Phoon Huat?
Friday, June 12, 2009
Thursday, June 4, 2009
Wednesday, June 3, 2009
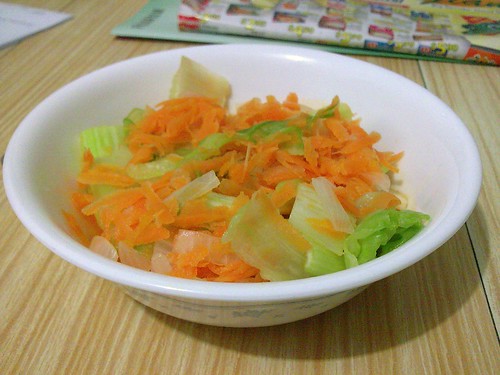
~ Veggies in Soy Sauce
I had loads of junk (catered) food today with no serving of greens and I felt terrible! I need an antioxidant boost from my veggies!! This is a quick, hassle-free way of getting free radical busters! "Stir-fry" veggies in minimal amount of water, drizzle with soy sauce, and feel the antioxidants do their magic in one's worn-out body!
Tuesday, June 2, 2009
~ Veggie Milky Soup
Taken from:
Tiff's
Tiff's
Description:
Veggie soup in a milk-base
Ingredients:
1/2 C milk
1 tsp corn starch
1/4 C corn kernels
1/4 C sweet peas
1 carrot, grated
1 tomato
2 lettuce leaves, shredded
1 tsp wheatgerm
1/2 C milk
1 tsp corn starch
1/4 C corn kernels
1/4 C sweet peas
1 carrot, grated
1 tomato
2 lettuce leaves, shredded
1 tsp wheatgerm
Directions:
1) Stir milk and corn starch together.
2) Bring milk mixture to boil along with all the veggies.
3) Stir till desired consistency and serve with wheatgerm.
Remarks:
1) Stir milk and corn starch together.
2) Bring milk mixture to boil along with all the veggies.
3) Stir till desired consistency and serve with wheatgerm.
Remarks:
Random tossing of ingredients.
Subscribe to:
Posts (Atom)